Getting Started with Sencha Touch 2: Build a Weather Utility App (Part 2)
 In this three-part Sencha Touch tutorial, you will build the Do I need my Umbrella app, a simple utility app that loads weather information from a web service — worldweatheronline.com. Based on weather codes, this app can predict if you need your umbrella or not.
In this second part of the tutorial, you will start to build an app theme. You will use the code from part 1 of this tutorial. You can find the tutorial here.
Here are some additional resources:
You can download the final app code — full solution and stylesheet.
There are some tutorial goodies.
You can see the app itself with the custom theme here.
This tutorial requires:
- Sencha Touch 2.3 or higher
- Sencha Cmd 4.x
- Compass & Sass on top of Ruby
- A modern browser
- Editor
Extend from the default theme
You will build a custom theme that is based on the default theme. The default theme is a good theme to extend from, because it has a lot of Sencha Sass variables and mixins, which can be found in the API Docs.
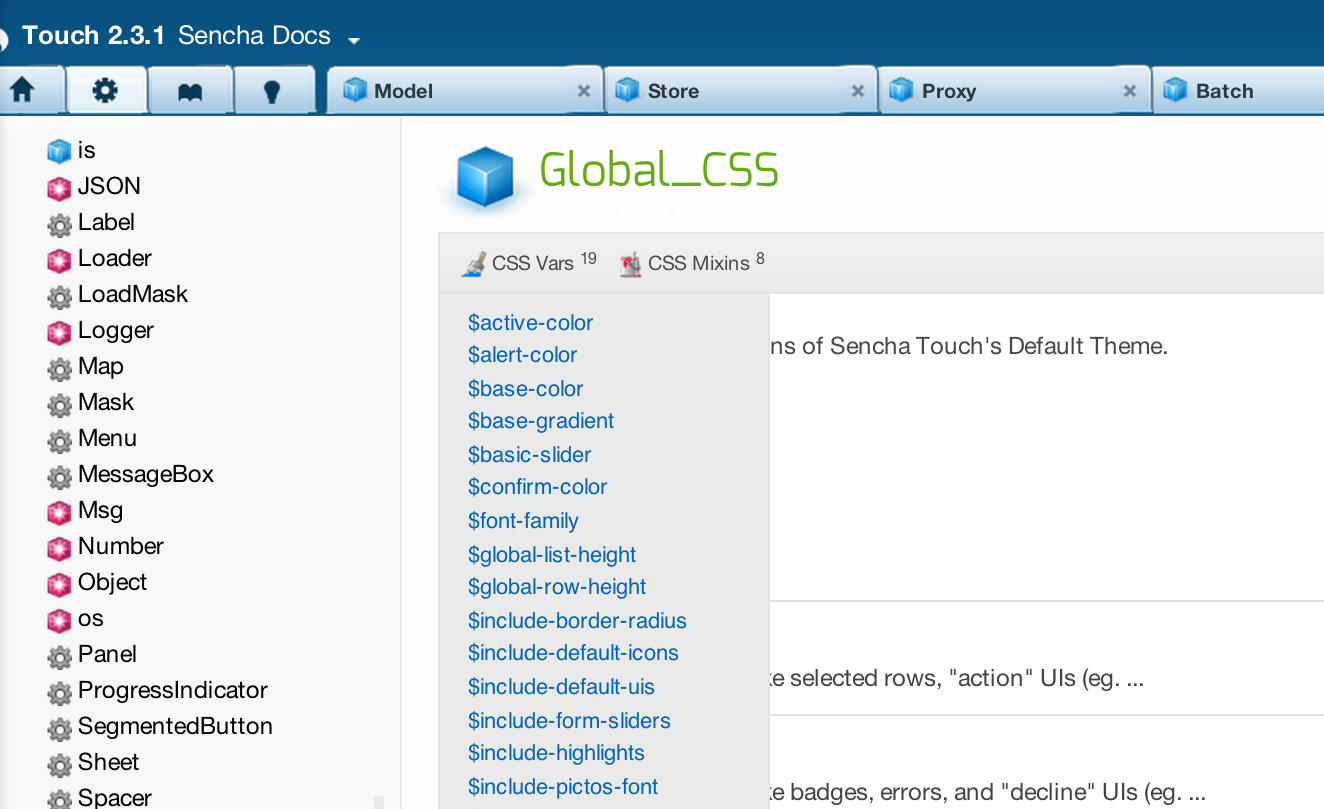
By default, when generating an application with Sencha Cmd, a resources folder is already generated for you, with an empty Sass stylesheet: app.scss.
Let’s open: app.scss
The Sass stylesheet will look like this:
//(1) Define your Sencha variables here

@import 'sencha-touch/default';
@import 'sencha-touch/default/all';

//(2) Define your custom Sass/CSS code and mixins here
In the top (1), you will define all your (Sencha) variables; directly after the variables you will include the mixins. It’s important to keep this order, otherwise the variables won’t have any effect. The imports make use of these variables.
After the imports (2), you can start writing your own custom CSS rules and mixins.
Let’s start very easy and change the base-color:
$base-color: #42282E;
By changing the base-color, you will set a primary color scheme that most of the Sencha Touch components use.
Let’s test it. With Sencha Cmd on the command-line, run the following command:
sencha app watch
Sencha Cmd 4 and higher has the command sencha app watch.
You can compare this with the Compass command: compass watch.
Sencha Cmd watches the app and every time you hit save, Sencha Cmd builds your app and compiles your Sass Stylesheets. When changes are detected, only the minimum amount of work necessary is performed to bring your app and its CSS up to date, saving you from rebuilding your Sass.
Preview your application in a modern browser: http://localhost/dinmu.
Now let’s play around. Sencha Touch has some really good Sass variables and mixins you can use to easily customize your theme.
A great tool to get the right color combinations is Adobe Kuler. Go explore some populair color schemes: https://kuler.adobe.com/explore/most-popular/?time=month, and let’s use these as the color variables for Do I need the Umbrella app.
Let’s set the colors for the buttons, alert box, and both screen backgrounds (settings and main):
$alert-color: #D6665A;
$confirm-color: #75A48B;
$page-bg-color: lighten(#D9CFB0,15%);
$form-bg-color: $page-bg-color;
Also, let’s get rid of all the gradients:
$base-gradient: 'none';
The bottom toolbar has the ui: ‘light’. Let’s create a mixin to style the light skin of the bottom toolbar. You can use the sencha-toolbar-ui for this. We can implement it below the sencha imports (2):
@include sencha-toolbar-ui('light', #DC9B74, 'none');
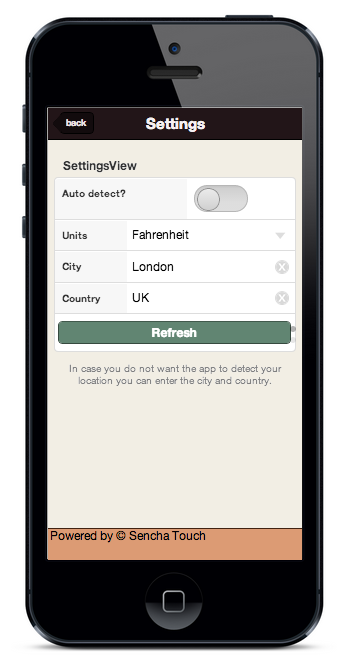
Create custom CSS
Now let’s implement our own CSS rules.
First, we will modify the toolbar title text:
.title {
        .x-title {
                line-height: 2.5em;
                text-shadow: none;
                letter-spacing: -1px;
        }
}
Next, let’s position the footer text:
.footer {
        font-size: 0.6em;
        padding: 12px;
        text-align: right;
        letter-spacing: 0;
        a {
                color :#000;
        }
}
You will also need some styles for the custom template.
Let’s modify the font and font colors:
.textview {
        color: black;
        line-height: 1.2em;
        letter-spacing: -1px;
        padding: 0.8em;
        text-transform: uppercase;


        .yes {
                color: $alert-color;
        }
        .no {
                color: $confirm-color;
        }
        .temp {
                color: $confirm-color;
        }
}
Let’s edit the settings form.
In your Sass stylesheet, create the styles to tweak the settings form:
.x-form-fieldset {
        .x-form-fieldset-inner {
                border: none;
                background: $page-bg-color;
        }
        .x-form-fieldset-instructions .x-innerhtml {
                color: #000;
        }
}

.x-form-label {
        background-color: lighten(#DC9B74, 32%);
}
.x-toggle-field .x-form-label {
        background: none;
        border: none;
        margin-bottom: 20px;
}
.x-toggle {
        position: absolute;
        right: 0;
}
Implement a custom font
Right above the sencha imports, add the imports for the font.
We will make use of the Google Fonts service. With this font-service you can browse through lots of hosted font families and choose a font to implement:
@import url(http://fonts.googleapis.com/css?family=Oswald:700);
@import url(http://fonts.googleapis.com/css?family=Lobster);
Now, set the fonts.
For the toolbar title, add the following rules to the .x-title CSS class:
font: {
        family: "Lobster";
        size: 1.2em;
}
For the template view, add the following rules to the .textview CSS class:
font: {
        family: "Oswald";
        size: 2em;
}
Tweak the performance
If you want to optimize your Sencha Touch application for performance, optimizing your Stylesheet is probably the easiest thing to do; and it’s very effective. Let’s reduce the file size of the compiled CSS stylesheet.
Automatically, when you generated your app with Sencha Cmd, the compiled CSS stylesheet was minified. This works because of the output_style setting in the resources/sass/config.rb file. Would you rather have the output readable? Set the output_style value to :expanded, but note, your file size will grow.
Check the resources/sass/config.rb file, it should be set like this:
output_style = :compressed
Instead of importing all Sencha Touch framework mixins, let’s only import the ones that are absolutely necessary. This will reduce the stylesheet size, so it will be faster to download.
I usually comment out the @import line that imports all the mixins. Then, I list all the Sencha Touch mixins myself, and I make sure Sencha Cmd is watching/compiling my Sass file (sencha app watch).
Then I start to comment out the mixins one by one, based on the classes I don’t use. This is tricky though; there are classes that you may have never directly coded, but they are subclasses from other classes, such as +Class+ or +Panel+. That’s why you should remove them one by one, while watching your terminal to see that you don’t get any compile errors. The list of all the available Sencha Touch mixins can be found in:
touch/resources/themes/[theme-to-extend-from]/all.scss.
Replace @import ‘sencha-touch/default/all’ with the following imports:
@import 'sencha-touch/default/src/_Class.scss';
@import 'sencha-touch/default/src/_Button.scss';
@import 'sencha-touch/default/src/_Panel.scss';
@import 'sencha-touch/default/src/_MessageBox.scss';
@import 'sencha-touch/default/src/_Toolbar.scss';
@import 'sencha-touch/default/src/carousel/_Carousel.scss';
@import 'sencha-touch/default/src/form/_Panel.scss';
@import 'sencha-touch/default/src/form/_FieldSet.scss';
@import 'sencha-touch/default/src/field/_Field';
@import 'sencha-touch/default/src/field/_Checkbox.scss';
@import 'sencha-touch/default/src/field/_Select.scss';
@import 'sencha-touch/default/src/field/_Slider.scss';
@import 'sencha-touch/default/src/field/_Spinner.scss';
@import 'sencha-touch/default/src/picker/_Picker.scss';
@import 'sencha-touch/default/src/slider/_Slider.scss';
@import 'sencha-touch/default/src/slider/_Toggle.scss';
We are not using many icons, so there is no need to implement the Pictos icon font.
In this case, let’s just use our own icon font, so we can save some extra kilobytes.
Add these variables to the top of your Sass stylesheet right before the import of the Sencha mixins:
$include-pictos-font: false;
$include-default-icons: false;
Now, you will include a custom icon font. I created an icon font via the IcoMoon website: http://www.icomoon.io. It’s in the goodies-tutorial folder of this tutorial. Just copy the dinmu fonts folder over to resources/sass/stylesheets/fonts/.
Underneath the imports of the google font, import the dinmu icon font:
@font-face {
        font-family: 'Dinmu';
        src:url('stylesheets/fonts/dinmu/Dinmu.eot');
        src:url('stylesheets/fonts/dinmu/Dinmu.eot?#iefix') format('embedded-opentype'),
                url('stylesheets/fonts/dinmu/Dinmu.ttf') format('truetype'),
                url('stylesheets/fonts/dinmu/Dinmu.woff') format('woff'),
                url('stylesheets/fonts/dinmu/Dinmu.svg#Dinmu') format('svg');
        font-weight: normal;
        font-style: normal;
}
Below all the imports, create an icon mixin, to display the settings button:
@include icon('settings', 's', 'Dinmu');
Directly after that, you can code some funny icons for the template view:
.rain:before,
.norain:before {
        font-family: 'Dinmu';
        speak: none;
        font-style: normal;
        font-weight: normal;
        font-variant: normal;
        text-transform: none;
        line-height: 1;

        padding-right: 10px;
        font-size: 60px;

        -webkit-font-smoothing: antialiased;
        -moz-osx-font-smoothing: grayscale;
}

.norain:before {
        content: "53";
        color: $confirm-color;
}
.rain:before {
        content: "52";
        color: $alert-color;
}
Finally, the Do I need my Umbrella theme is finished! Open your browser and run: http://localhost/dinmu.
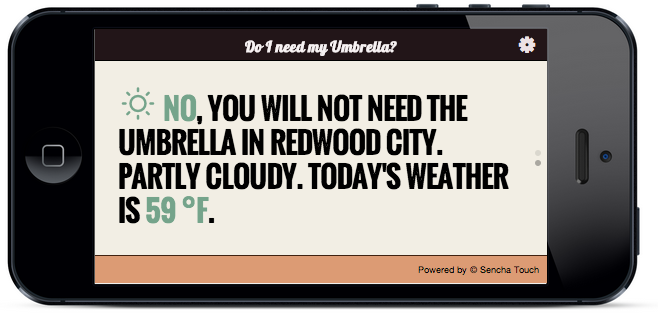
The next steps for improving your application would be to create a production build and port this app to a native PhoneGap app. These topics will be discussed in part 3 of this tutorial.
Interested in creating Sencha themes? Starting in December, Sencha will start offering advanced Ext JS theming courses. Take a look at the open courses located around the world or join an online training.
When it comes to developing robust, enterprise-grade web applications, Sencha provides some of the most…
The Sencha team is excited to announce the latest Ext JS version 7.9 and Rapid…

It is important to select the best app development software with proper instructions that enhance…


